General
This sections allows to configure general settings related to the application, data export, smart card, and wiegand. It consists of the following tabs:
Screen Layout of Application Configuration

Field Description of Application Configuration
Configure the following using this section:
The following options will be displayed:

URL:
Cloud Port:
|
NOTE This tab is visible only if IXM Mobile license is purchased. You can request License from License module >> click on IXM Mobile icon.
|
Use this section to configure Digital Card settings which will be used while generating Digital Card Numbers.

Configure Digital Card settings by providing the following information. This information is used while entering details of Digital Cards from Employee >> Biometric Data Enrollment >> Digital Card section.
Allow Offline Transactions
Click on the checkbox to enable or disable the feature. A tick mark in the box indicates the feature is enabled. This feature specifies whether the Digital Card transactions can be done offline or online.
Enabling this feature allows the users to authenticate the Digital Card even if the mobile device is offline. While configuring a Digital Card for the first time, the mobile device should be online so that the IXM Mobile app communicates with the server to read the card details and save them on the mobile device. For the subsequent transactions, the credentials are read from the mobile device itself.
Disabling this feature will allow the users to authenticate the Digital Card only if the mobile device is online. For each transaction, the IXM Mobile app will communicate with the server to fetch the card details required for authentication.
Format:
Select the Digital Card Format from the dropdown list.
A list of Wiegand Formats defined from General Settings >> Wiegand section will be displayed. Select the Wiegand Format in which the details of the Digital Card will be formatted and sent to the IXM Mobile app.
|
NOTE It is mandatory to send selected Card Format to Device(s) from General Settings >> Wiegand section.
|
Digital Card:
Select the method from the dropdown list. The following three methods can be used to generate Card Number:
-
None
Digital Card Number can be entered manually.
-
Employee ID
The Employee ID will be considered as the Digital Card Number.
For example: The Card Number of an Employee with ID 1025 will also be 1025. But if the Employee ID is having an alphanumeric value, then the Card Number will be blank.
-
Start with
The Digital Card Number will start with a particular sequence number.
For example: If 1001 is entered, the Card Number will start with 1001. The next number generated will be 1002 and so on.
Start With:

This option will be displayed only if Digital Card is selected as "Start With".
Enter the starting number of the Digital Card.
Once entered, click on Apply button to save the settings.
|
NOTE This tab is visible only if IXM Mobile license is purchased. You can request License from License module >> click on IXM Mobile icon.
|
Use this section to specify the Administrator for IXM Mobile app.

IXM Mobile Admin

|
This feature is exclusively for IXM VERTU devices. |
To secure sites from unauthorized access, transferring the Digital Signature / Key to IXM VERTU devices is very important. But since IXM WEB cannot communicate directly with VERTU devices, the Digital Signature / Key needs to be transferred manually by an Employee who is authorized to do so. Once logged in to the IXM Mobile app, this Employee can follow the instructions to transfer the Digital Signature / Key and secure the site.
Employee:
Select Employee(s) authorized to transfer the Key from the dropdown list. Remove a particular Employee from the list by clicking on x icon of that Employee.
Once selected, click on Apply button to save the settings.
Click on this section to take backup of IXM WEB Database. The following options will be displayed:

SQL Server Name:
Displays the SQL Server Name for your reference.
Database Name:
Displays the name of the last backup file for your reference.
Last Backup:
Displays the date of last backup taken for your reference.
Click on Backup button to take latest backup of IXM WEB Database. The backup process will start and upon completion, the backup will be saved in file “Database_DD_MM_YYYY.bak” (default file name) on your local machine.
|
NOTE The application will not allow the user to take a backup if the database connection is configured with SQL Server Authentication. |
This feature sends live snackbar notifications to all the logged in users of IXM WEB whenever an event related to IXM Health module occurs.
Enable
Click on the checkbox to enable or disable the feature. If the feature is enabled, snackbar notifications will be sent to all logged in users whenever events related to IXM Health module take place. For example, whenever Mask Authentication or Thermal Authentication is attempted, a notification informing its success or failure will be sent to the users.Once selected, click on APPLY button to save and apply the settings.
The following options will be displayed:

IXM WEB supports Lightweight Directory Access Protocol (LDAP).
Connection String:
Enter the valid LDAP string.
|
NOTE Common syntax of a LDAP string is “LDAP://domain-controller/dc=ad,dc=local" where domain-controller is the full domain name and "dc" is the domain culture.
|
Once entered, click on APPLY button to save and apply the settings.
Click on RESET button to restore the original settings.
Screen Layout of Data Export

Field Description of Data Export
IXM Data Export module can be used to configure and export the data from Monitor >> Logs >> Transaction Logs into a "CSV" or "TXT" file. The file containing the exported data can then be used to import that data into any third party system.
Field Description of Data Export
Before exporting, the data needs to be configured by clicking on the Configuration button at the bottom of the screen. Read more...
File Name:
Enter the name of the export file.

|
The File Name should not contain special characters such as \, /, :, *, ?, ", <, >, | |
Data Separator:
If the export file type is "TXT", enter the data separator.
If the export file type is "CSV", "," will be displayed as the default data separator. It can not be changed.
From Date:
Enter or use the calender icon to specify the date starting which the data should be taken from the Transaction Logs.

|
The date range can not be more than 60 days. |
To Date:
Enter or use the calender icon to specify the date up to which the data should be taken from the Transaction Logs.

|
The date range can not be more than 60 days. |
Access Events:
Select the Event Type from the dropdown list.
Select "Access Granted" to export only those transactions where the Event is "Access Granted".
Select "Access Denied" to export only those transactions where the Event is "Access Denied".
Select "Both" to export transactions where the Event is "Access Granted" and "Access Denied".
File Format:
Select the File Format for export from the dropdown list. The following are the File Formats:
-
TXT
-
CSV
Include Header
Click on the checkbox to include the Column Names in the export file. If the box is empty, the Column Names will not be displayed.
Click on Configuration button to configure the data for export. The following options will be displayed:
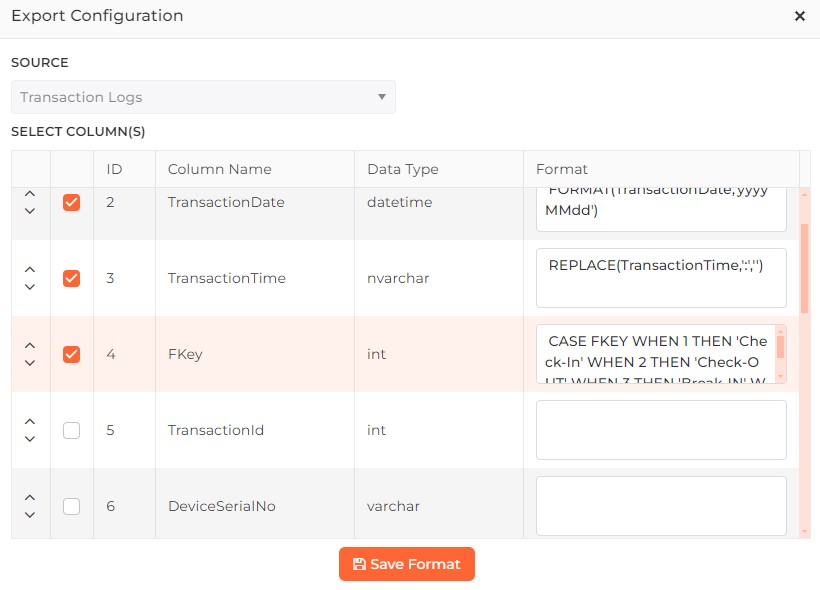
SOURCE
The data will be exported from the Transaction Logs. Hence, the Source is displayed as "Transaction Logs" by default and can not be changed.
SELECT COLUMN(S)
A list of column names belonging to the Transaction Log is displayed as follows:
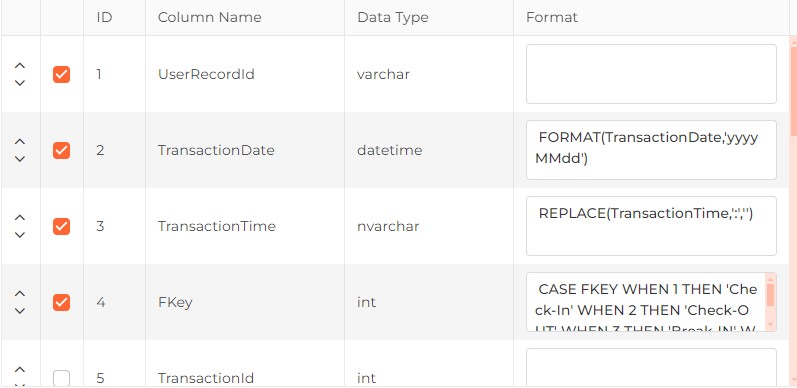
Click on the respective checkbox of the Column that needs to be exported. Only the selected Columns will be exported. The first four Columns are selected by default which can be changed. But at least one Column should be selected.
You can also change the position of a Column by moving it up or down by clicking on ˄ or ˅ icons respectively. The sequence of the Columns displayed in the export file depends on their position in this list.
ID:
Denotes the serial number of the Column.
Column Name:
Displays the name of the Column in Transaction Logs.
Data Type:
Displays he data type of the Column in Transaction Logs.
Format:
This option allows to change the format of the Column data at the time of export. To do so, enter the appropriate SQL command in this option. For example, the column "TransactionDate" contains both date and time in Transaction Logs. You can extract only the date part by writing the command "FORMAT(TransactionDate, 'yyyyMMdd').

Leave the box blank if you want to export the Column data as it is.
Once done, click on Save Format button to save the format. The application will display an error message in case of wrong command entered. Or else the control will go back to the previous screen.
Click on Apply Filter button to filter the data as per requirement. Following options will be displayed -
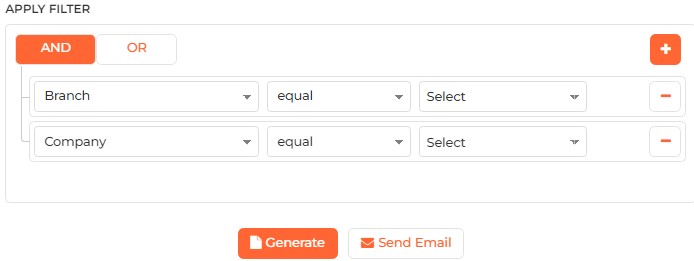
Click on + icon on the right side of the screen to create a multilevel condition. You can remove a particular condition by clicking on - icon on its row. You can use AND and OR operators by clicking on their respective buttons on the top. The first column in the list displays the field name. The second column displays the condition and the third column accepts the value of the selected field.
Click on OK button to save the Filter condition or Clear Filter button to remove the entered filter condition.
Click on Export button to export the data from Transaction Logs to the export file as per the configuration and filter applied. The file will be downloaded automatically in the "Downloads" folder. The file name is a combination of name entered in "File Name" + mm-dd-yyyy + h-m-s. Sample TXT file
Screen Layout of Options

IXM WEB Options can be configured to update or change the Device’s settings. The following sections will be visible on the page for users to apply changes:
-
Employee templates
-
Biometric capture devices
-
Delete the application log
-
Template conversation (NOTE: visible for all the Device types, but functional only for the TOUCH 2 Face Device)
Field Description of Options
EMPLOYEE
Certificate for IXM WEB:
“ixm.web” is the default certificate that will be used when SSL settings are enabled. IXM Devices and IXM WEB will use this ixm.web certificate for encrypted communication.
Certificate for IXM WEB Cloud:
When IXM WEB Cloud settings are enabled, IXM Devices will require a certificate to do encrypted communication over the Cloud. “ixm.device” is the default certificate stored in the machine console that is available in the server PC/laptop where IXM WEB is installed.
TEMPERATURE UNIT
|
NOTE This option will be visible only if IXM Health license is purchased.
|
Temperature Unit
Celsius
Click on this option to select the unit of temperature as Celsius. As a result, temperature will be displayed in Celsius in IXM Health Module and IXM Health reports.
Fahrenheit
Click on this option to select the unit of temperature as Fahrenheit. As a result, temperature will be displayed in Fahrenheit in IXM Health Module and IXM Health reports.
DATE FORMAT
Format:
Select the Date Format from the dropdown list. The dates will be displayed and accepted in the selected format across IXM WEB.
The following two date formats are available:
mm/dd/yyyy
This is the default date format.
dd/mm/yyyy
AUTO REFRESH DASHBOARD
Status
Click on the checkbox to enable or disable the feature. A check mark in the box indicates the feature is enabled. By default, the feature is enabled.
Enabling this feature will automatically refresh the Dashboard.
Interval (sec):
Enter the time duration in seconds. The Dashboard will be refreshed after every number of seconds entered here.
DELETE APPLICATION LOGS
Auto-Delete
By default, the Auto-Delete option will be disabled. Enabling Auto-Delete will delete the logs older than a specified number of days. By default, after enabling the Auto-Delete option, IXM WEB will automatically delete application logs every 30 days.
Delete Logs older than (Days):
Enter a value between 1 and 365 days to delete logs older than the entered value.
BIOMETRIC CAPTURE DEVICE
USB Sensor Service Port:
By default, the USB Sensor Service Port is set to 1400, or you can change the port to detect a USB Sensor Device. The application will detect a USB Sensor after successfully updating the USB Sensor driver in your system.
SAVE BIOMETRIC IN DATABASE
This feature allows to store the Employee’s biometric templates in the IXM WEB database.
Face
Enabling this feature allows to store the Employee's face images in the IXM WEB database. By disabling this option, biometric templates will not be saved in the database, but the Employee can save the biometric template on a Smart Card.
Fingerprint
Enabling this feature allows to store the Employee's fingerprint images in the IXM WEB database. By disabling this option, biometric templates will not be saved in the database, but the Employee can save the biometric templates on a Smart Card.
Finger Vein
Enabling this feature allows to store the Employee's finger vein images in the IXM WEB database. By disabling this option, biometric templates will not be saved in the database, but the Employee can save the biometric templates on a Smart Card.
TEMPLATE CONVERSION
On the Fly Conversion
By default, this option will be enabled. If enabled, IXM WEB will convert the TITAN Face template to a TOUCH 2 template immediately after successful enrollment. If the option is disabled, the conversion will be taken care of by the back-end service instead.
Primary Device for Conversion:
Employees can select the TOUCH 2 Device as the primary Device for Face template conversions.
FACE CONVERSION

|
This option will be visible only if IXM Face Convert license is purchased. You can request License from License >> Convert option. |
Primary Device:
Select the primary Device for face conversion from the dropdown list. It can be either a TITAN or a TFACE Device.
If the selected Device is offline, the next registered Device that is on line will be selected automatically provided that Device is connected through Ethernet.
If the selected Device goes offline for more than 24 hours while the face conversion process is in progress, the rest of the face images will not be converted and the application log will display "Device is offline" message for such transactions.
SAVE FINGERPRINT IMAGE

|
This option will be enabled only if Fingerprint feature is enabled to store the Employee's fingerprint images in the IXM WEB database. |
Status
Saving an Employee's fingerprint images in the IXM WEB database can be a potential threat to security besides consuming database storage space. Therefore, IXM WEB displays a warning message informing the same.
Click on the checkbox to enable or disable the feature. Enabling this feature will display a warning message as follows:

Click on the OK button to continue with saving the fingerprint images on the database. Click on the Cancel button to disable the feature.
Click on the Save button to save the settings. Click on the Reset button to remove the selection.
|
|
Screen Layout of Smart Card Settings
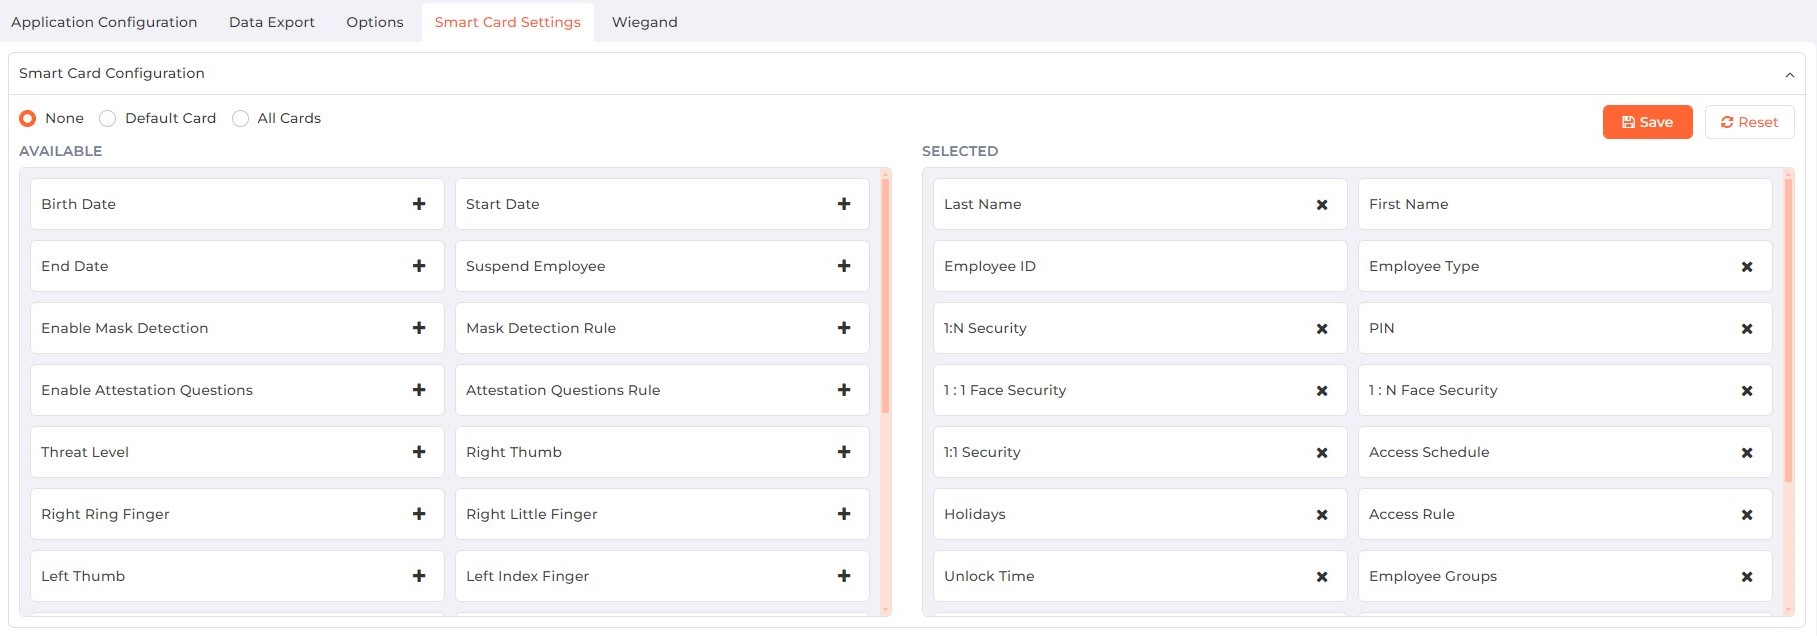
IXM Devices come in model variants that are equipped with an internal Smart Card reader for multi-factor authentication. Smart Cards are RFID access cards that have on-card memory to store biometric data and are usually provided to individual users who are granted access to the facility. All issued cards can be monitored and tracked in the IXM WEB database.
Field Description of Smart Card Settings
Smart Card Configuration
Through this option you can configure the Employee data that should be stored in the Smart Card as per requirement. So when an Employee is transferred to a Smart Card through Employees >> Transfer section, the Employee data that will be stored in the Smart Card depends on the Smart Card configuration.
None
Select this option by clicking on it if you don't want to transfer Employee data from any Card of the Employee(s).
Default Card
Select this option by clicking on it if you want to transfer Employee data only from the Default Card of the Employee(s).
All Cards
Select this option by clicking on it if you want to transfer Employee data only from all Cards of the Employee(s).
AVAILABLE
A list of all Employee fields is available to select from. Click on the + icon in the box of respective field to add that field to SELECTED section.
SELECTED
A list of default selected Employee fields along with the fields selected by you will be displayed in this section. Data belonging to these selected fields will be written on the Smart Card. You can remove any of the fields (except "Employee ID" and "First Name") by clicking on the x icon in the box of that field.

"Employee ID" and "First Name" are mandatory information to be stored on a Smart Card and therefore can not be removed from here.
Click on Save button to save the configuration. Click on Reset button to remove all the selected fields (except "Employee ID", "First Name", and other default fields).
Smart Card Employees
There are some occasions such as Employee leaving the company, where access of a particular Smart Card needs to be deactivated (Revoked) and reactivated (Unrevoked).
Click on "Smart Card Employees" to expand the section. A list of Employees with their Smart Card details will be displayed as follows -

To revoke Employees, select the Employees whose Cards need to be deactivated and click on Revoke button on the top right corner of the list.
To unrevoke Employees, select the Employees whose Cards need to be activated again and click on Unrevoke button on the top right corner of the list.
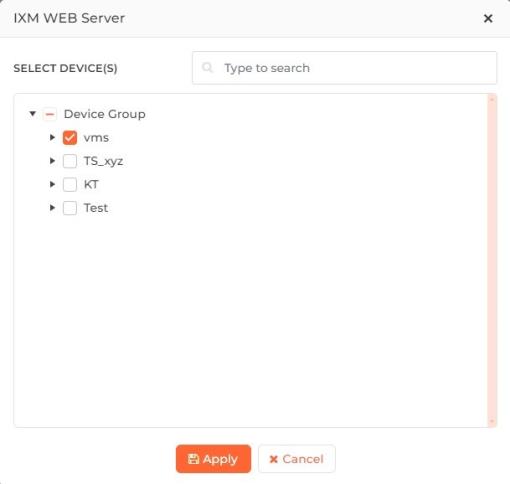
Following screen will be displayed to select the Devices -
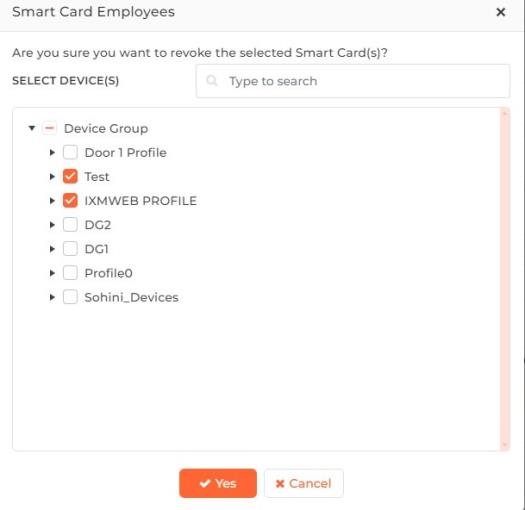
Click on the arrow keys to expand the Device Group and select the desired Device(s) by clicking on the checkboxes.
Once selected, click on OK button to Revoke / Unrevoke the selected Employees from the selected Device(s).
Screen Layout of Wiegand
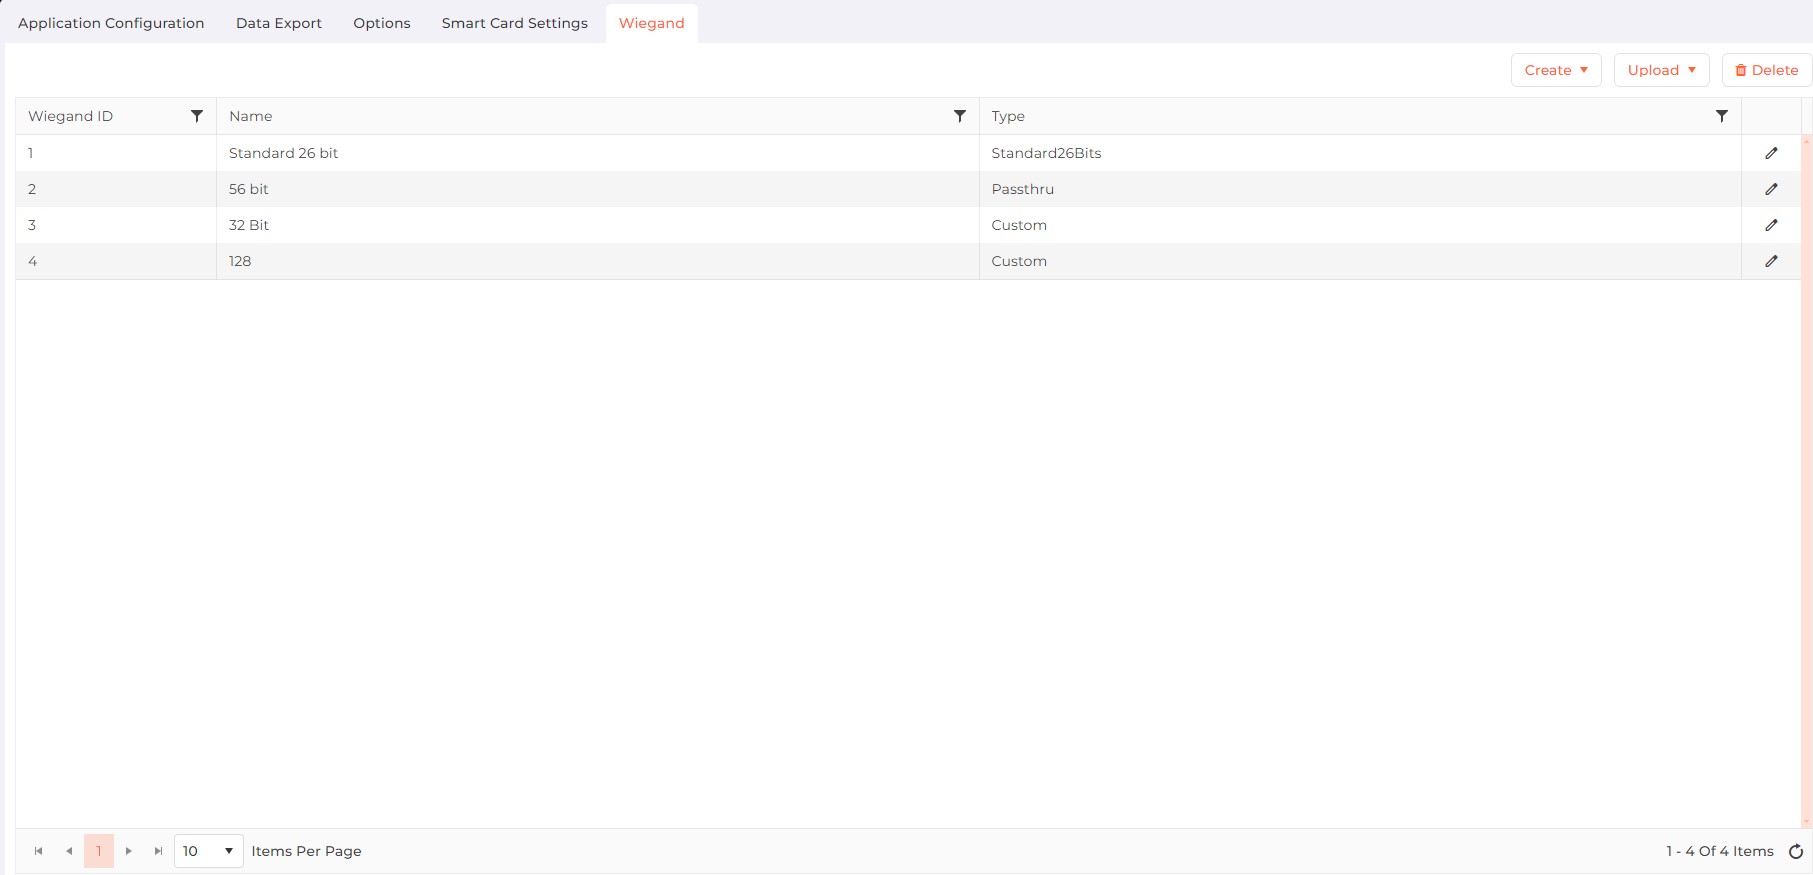
Wiegand Format is a string of predefined bits. In simpler terms, it is the arrangement of binary card data and is required to analyze the data received from the input, and before sending, the data will be put into a predefined format. Wiegand strings consist of even parity, odd parity, facility code, and ID codes. Invixium Devices support the following Wiegand formats:
-
26-bit standard format
The Standard 26-bit Format is an open format. It is widely used by various industries and is available from many sources. Almost all access control systems accept the Standard 26-bit Format.
-
Pass-Thru Wiegand
This format is customized as compared to the 26-bit standard format. This Wiegand Format string does not contain any Parity bits and Facility code bits, the format string of this Wiegand type will only contain ID codes.
-
Custom Wiegand
In custom Wiegand Format, all parts of the Wiegand string are customizable. This type of Wiegand Format contains Parity bits and ID code bits in the Wiegand Format string. The maximum length of a custom Wiegand Format is 512 bits. Custom Wiegand Format gives complete freedom to the admin to create a Wiegand Format. Admin can specify any number of user fields, can have any number of ID bits, and can have a maximum of four even parity and four odd parity bits.
Field Description of Wiegand
A list of existing Wiegands is displayed. Please note that the Standard 26-bit Format Wiegand is automatically created and it can not be deleted.
Hover mouse over  button on the top right corner of the screen and select the
"Passthru"option from the dropdown menu. Following options will be displayed -

Wiegand Name:
Enter the name of the Passthru Wiegand.
Total Bits:
Enter the total number of Bits that has to be assigned to the Wiegand.
ID Bits:
Enter the number of ID Bits of the Wiegand. ID Bits can not be more than the Total Bits.
ID BIT MASK
You will see a number of small boxes where each box represents a Bit. The total number of boxes displayed will be equal to the Total Bits entered starting with 0.
Select the position of ID bits to create an ID bit mask. To do so, click on the legend box of ID Bit to pick the color and click on the Bit Format to mask it. The color of that Bit(s) will change to the selected box color. You can either click on the individual Bit or press <Left click> and drag the mouse to select bits in continuity. Selected Bits can be distinguished by a different color.
|
NOTE The number of masked ID Bits should be equal to the number of ID bits.
|
Once selected, click on Save button. The Wiegand format will be created and displayed in the list.
|
|
Hover mouse over  button on the top right corner of the screen and select the
"Custom" option from the dropdown menu. Following options will be displayed -

Name:
Enter the name of the Custom Wiegand.
Total Bits:
Enter the total number of Bits that has to be assigned to the Wiegand. Total Bits can be between 1 - 512.
Click on Next button. Following screen will be displayed -

FORMAT
You will see a number of small boxes where each box represents a Bit. The total number of boxes displayed will be equal to the Total Bits entered starting with 0.
Now you can specify the ID Bits, Even and Odd Parity Bits, Flex Bits, Facility Code Bits and Issue Level Bits within the Total Bits. To do so, click on the legend box of respective Bit to pick the color and click on the Bit Format to mask it. The color of that Bit(s) will change to the selected box color.
Once selected, click on Next button. Following screen will be displayed -
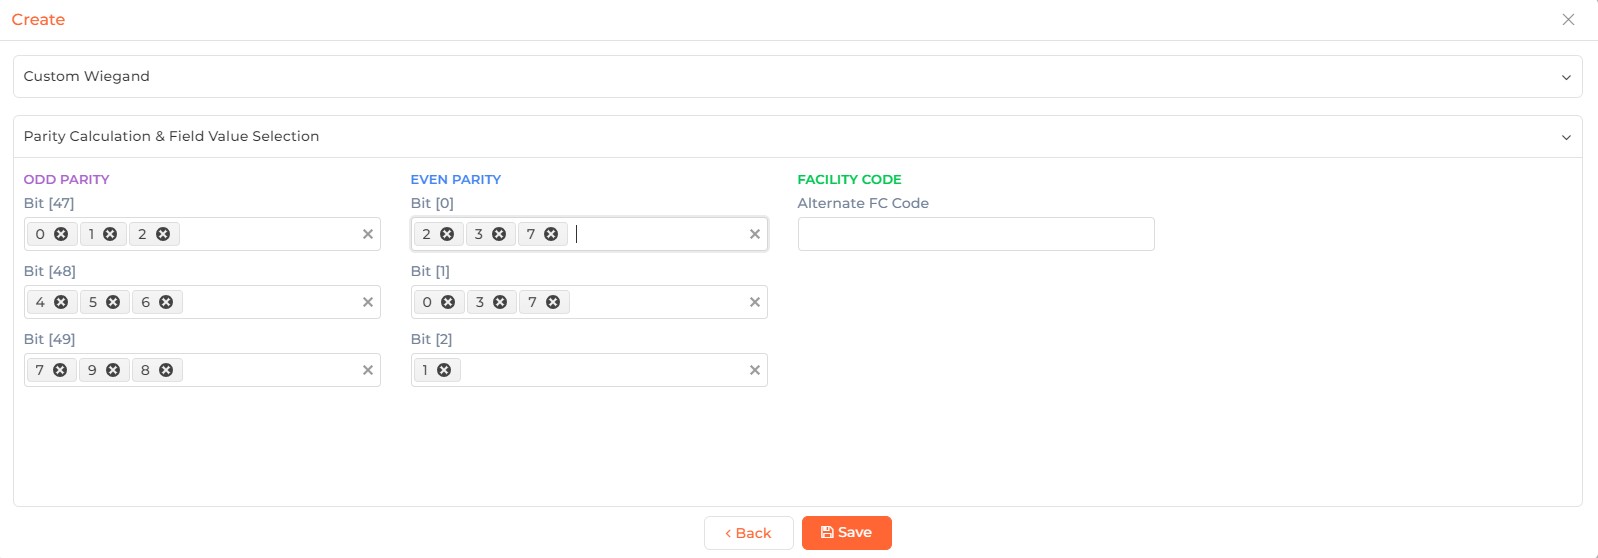

|
Please note that this screen will be displayed only if Even and Odd Parity Bits, Flex Bits, and Facility Code Bits have been masked within the Total Bits. |
Specify the Bits for Odd Parity, Even Parity, and Flex Bits by selecting them in the respective boxes as per requirement.
Once selected, click on Save button. The Wiegand format will be created and displayed in the list. Click on Back button to go back to the previous screen.
Click on the ![]() icon in the Action column of respective Wiegand row. Details of the selected Wiegand will be displayed. You can make required changes and click on Save button to save the Wiegand.
icon in the Action column of respective Wiegand row. Details of the selected Wiegand will be displayed. You can make required changes and click on Save button to save the Wiegand.
Hover the mouse on  button to send the selected Wiegand to one or more Devices. Select "Selected" option to upload particular Wiegand(s) or "All" option to upload all Wiegands. Following screen will be displayed to select the Devices -
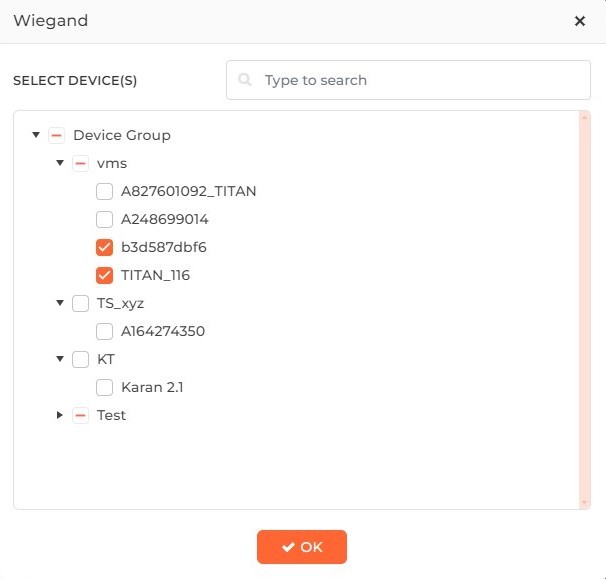
Click on the arrow keys to expand the Device Group and select the desired Device(s) by clicking on the checkboxes.
Once selected, click on OK button to send the selected / all Wiegand(s) to the selected Device(s).
Upon completion of the process, the “Application Logs” window will show a success or failure message.
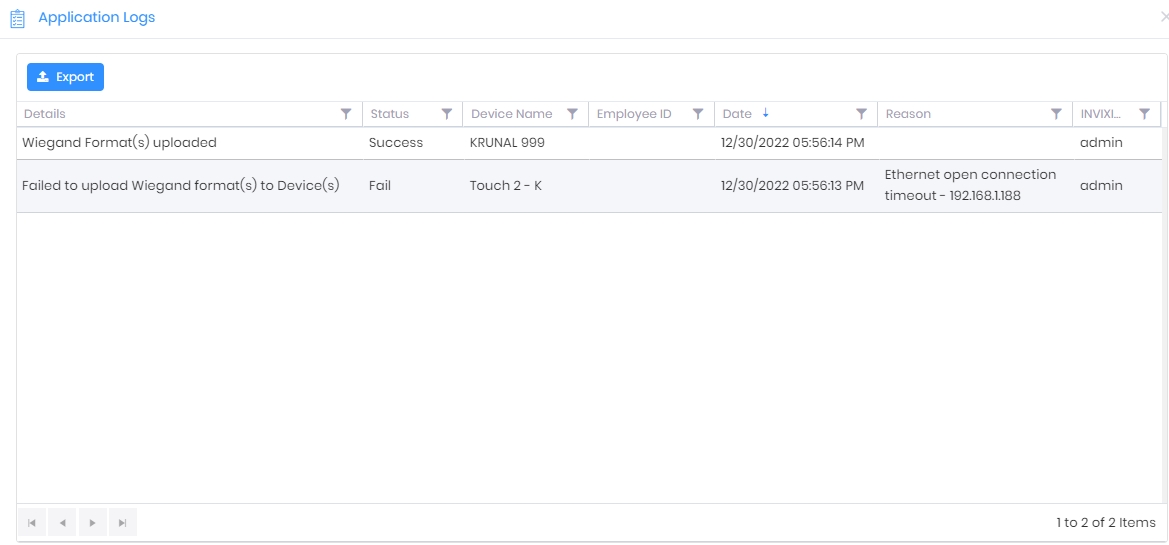
Click on  button to delete one or more selected Wiegands. The application will display a confirmation message as follows -
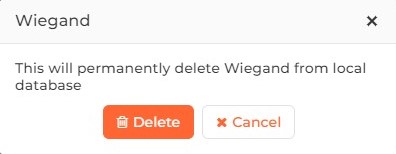
Click on Delete button to delete the selected Wiegands. The application will display "Wiegand(s) deleted" message and they will be deleted from the list. Click on Cancel button to discard the action.
|
NOTE A Wiegand Format can not be deleted if it is used to configure the Digital Card. |

